Setup Quuppa integration
Instructions on how to set up the integration with the Quuppa high precision system, including installation of the Sensolus-Quuppa-Bridge
Installation steps at a glance
From a high-level point of view, this involves the following:
- Perform a well functioning Quuppa deployment, with BLE compatibility mode activated. This is not further described on this page.
- The Quuppa compatibility feature must be activated on the tracker. Contact your Sensolus support to ensure that the tracker settings are remotely applied. This is not further described on this page.
- Add WGS-84 coordinates to the Quuppa project, so that QPE maps the (x,y) to (latitude,longitude) coordinates. (https://www.quuppa.com/documentation/QSP/topics/QSP_expose_wgs84_coordinates_via_API.html). This is not described in detail on this page.
- In the Sensolus platform, for the organization, a virtual Quuppa infrastructure item must be created. This generates the unique communication endpoint that will be need for the integration. Contact your Sensolus support for this.
- The Sensolus-Quuppa-Bridge (SQB) software should be installed. It requires the Docker runtime environment. The easiest is to install this on the same Linux server which runs the Quuppa Positioning Engine (QPE).
- Using the Quuppa Site Planner, apply the necessary configurations, mainly:
- Define UDP Push channels, so that QPE sends the tag information to the SQB.
- Upload the floor plan image as a geolayer in the Sensolus platform (this is optional but highly recommended).
- Perform basic tests.
Tips for WGS-84 coordinate mapping, floor plans and geozones
When the complete solution is operational, multiple layers are involved (geozones, floor plans, tracker locations) that depend on a correct referencing to enable correct positioning on a map. This referencing is a manual task, and there is often a small amount error in the manual referencing. So take in mind the following guidelines:
- When setting the coordinates of specific anchor points for referencing in the Quuppa Site planner, you typically will use landmarks (buildings) to find specific coordinates. Especially at high zoom levels, there may slight changes between Map providers in how satellite images are mapped to the globe. For this reason, use OpenStreetMap to retrieve the coordinates, because the Sensolus platform also uses OpenStreetMap as a map provider.
- Ideally, you have a high detail floor plan that you will upload in the Sensolus platform. Here also, it may be tricky to apply the correct mapping. Ideally, do this after you the integration is working, and use a number of real trackers that have accurate Quuppa positions as calibration markers, and then zoom/pan the floor plan so that it matches.
- When adding high-precision geozones in the Sensolus platform, it's best to first place trackers in the area of interest, and use these 'calibration points' draw geozones. Drawing the geozone edges based solely on the floor plan image might be inaccurate due to the introduced small mapping errors.
Quuppa infrastructure item in Sensolus platform
The Quuppa deployment is represented in the Sensolus platform as an infrastructure item (see also: Infrastructure management). This allows to quickly confirm whether the integration is operational: on each update sent by the SQB, the Last Seen field will be updated. This means that if communication the would somehow stop working, the status field will eventually show to "Not OK", and you will know when the last successful communication occurred.
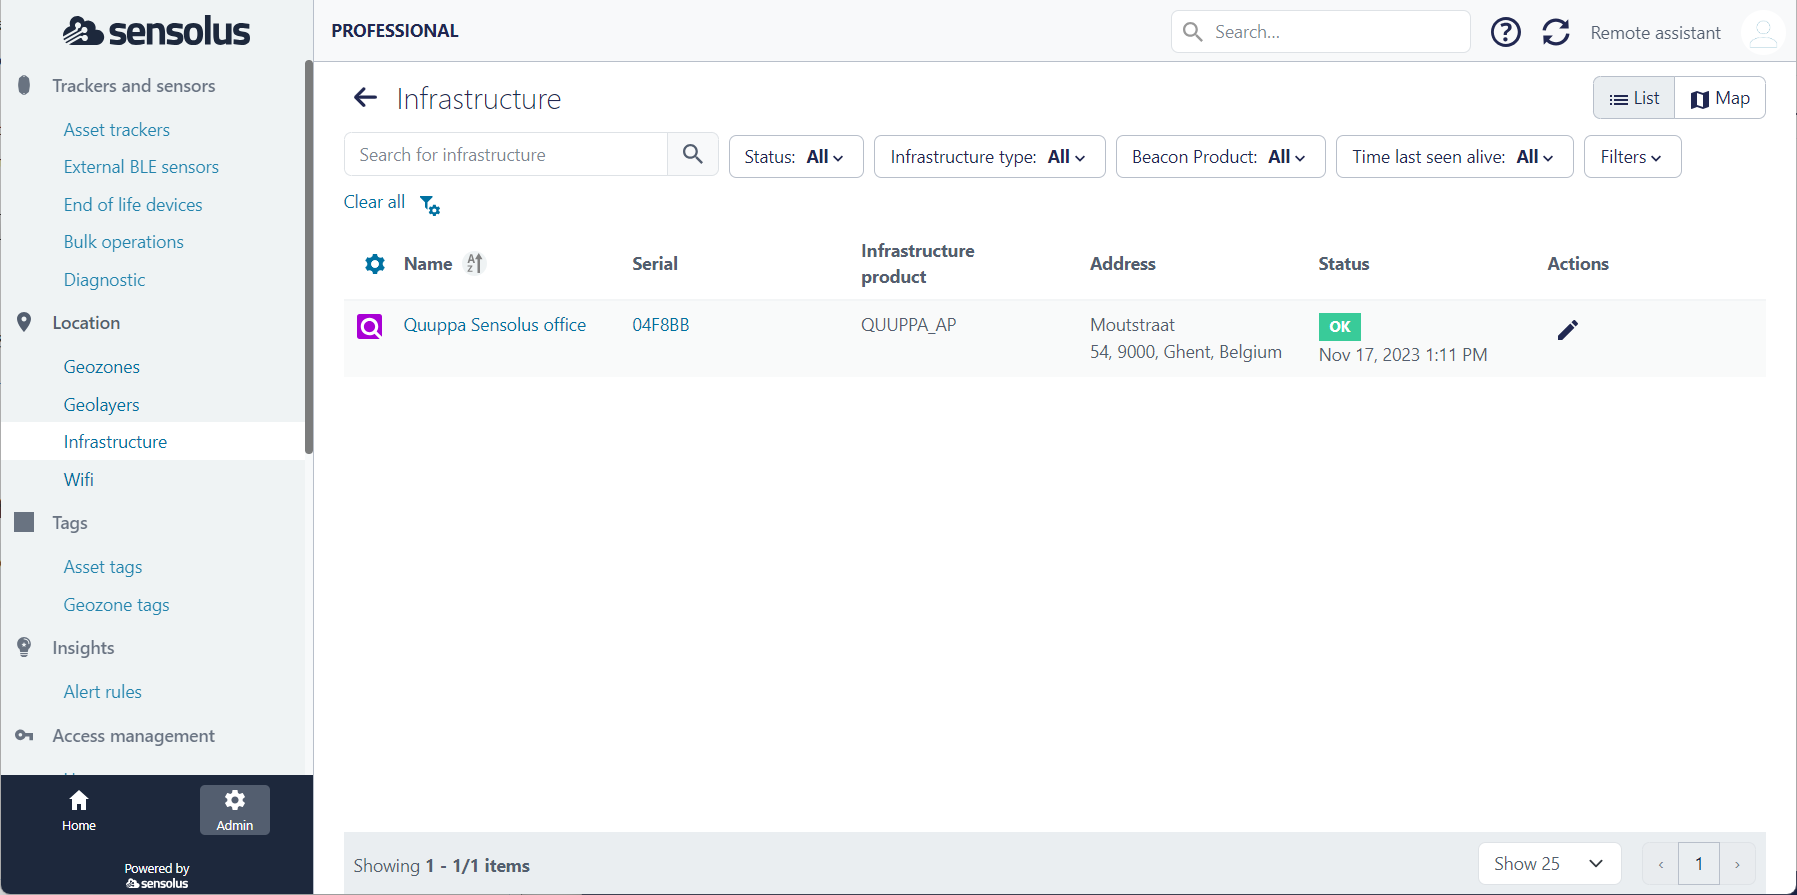
On the Info tab of a selected Quuppa infrastructure, more details can be found.
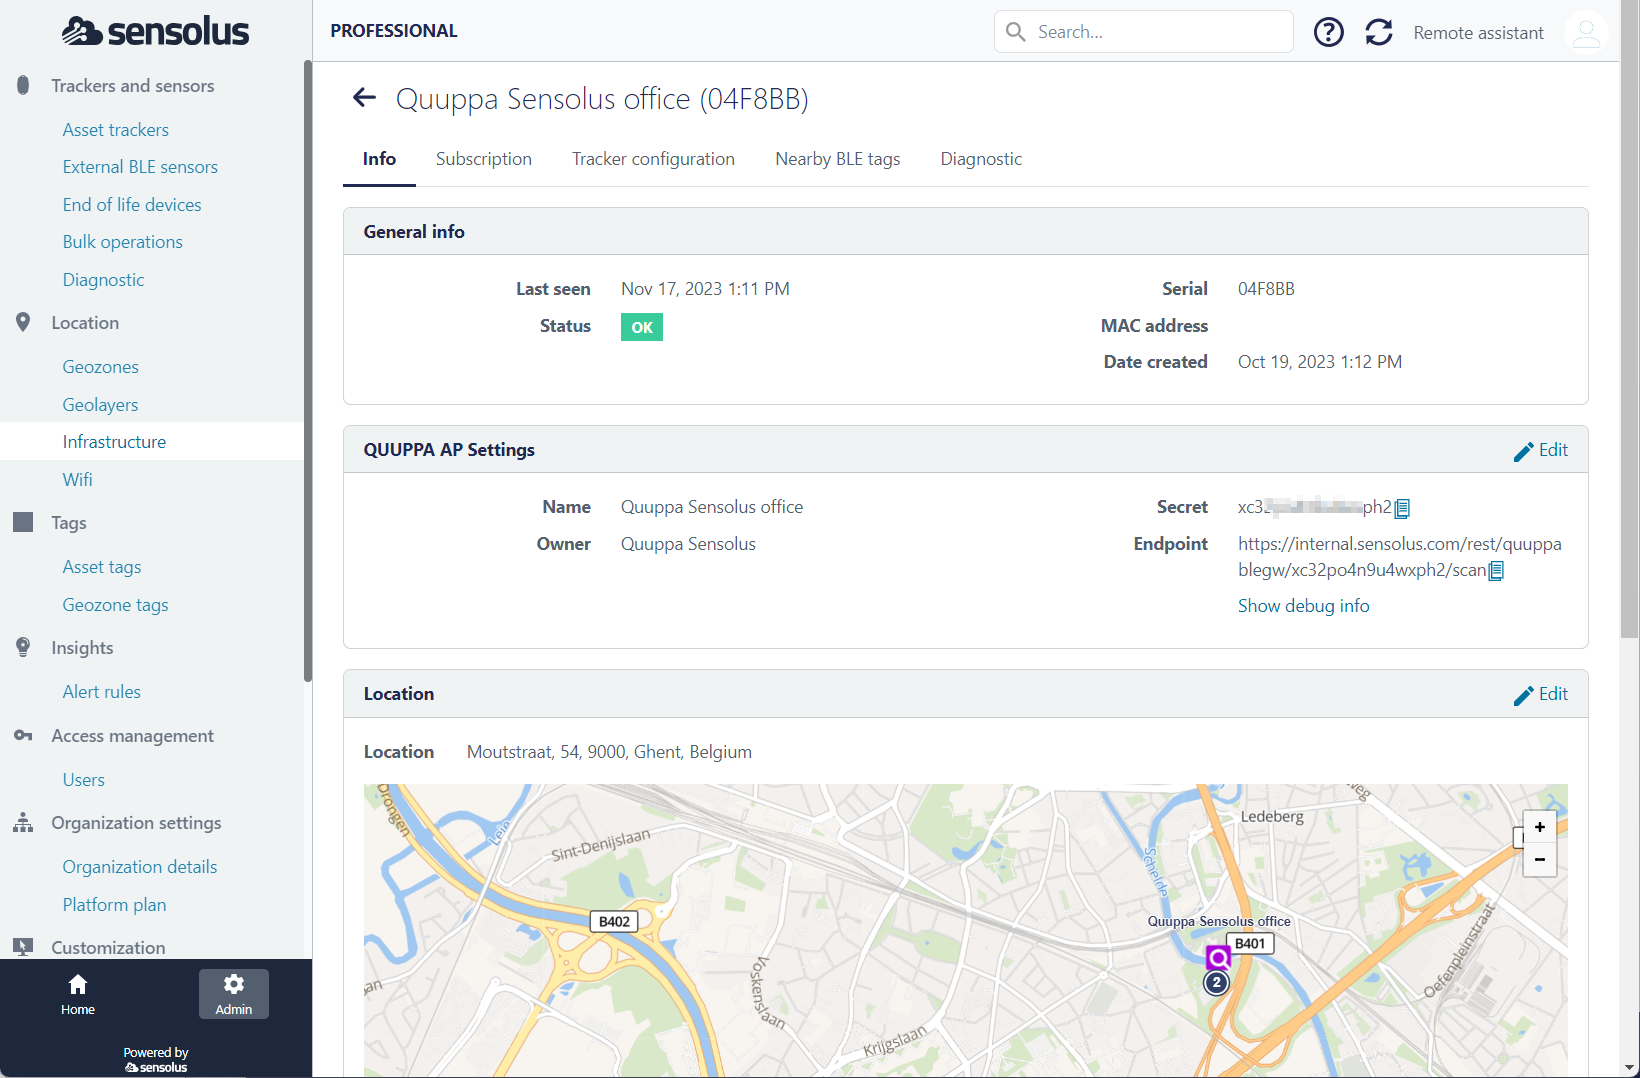
Here, it is important to find the value of the field named Secret. During the installation, this secret will need to be entered in the configuration file of the Sensolus-Quuppa-Bridge software.
Note that the Quuppa infrastructure item in the Sensolus platform represents the entire deployment as whole. The individual Quuppa Locators are not known to the Sensolus platform. A location and address of the Quuppa deployment be entered, purely for informational reasons - this has no impact on the functioning.
Installing the Sensolus-Quuppa-Bridge (SQB) software
The SQB is will process and relay information from the QPE to the Sensolus platform. First, verify the following prerequisites:
- Unless there are high CPU load concerns, install the SQB on the same server running the QPE. Alternatively, provision a dedicated Linux server in the same network as the QPE server.
- The server is typically Linux based. Basic Linux command line proficiency and experience with the Docker runtime is required.
- The server requires outbound HTTPS internet access, for the following
reasons:
- QPE synchronizes its configuration from a Quuppa remote online service.
- SQB must be able to push data the Sensolus platform.
- Docker engine must be able to fetch the Docker images from Docker Hub
- You need a login with administrative permissions (sudo permissions) on the Linux server.
- Highly recommended: Establish a way for remote access to the server; and/or establish agreements who will perform the initial investigations when there are issues reported that require inspecting the system.
Now, create a Docker Compose deployment file:
- Create the directory /opt/sensolus-bridge (this directory name is a convention; strictly speaking you can choose another directory) (mkdir command)
- In this directory, create a new file named docker-compose.yml (touch command)
- Copy the content of docker compose file template, as is it available on the Docker Hub overview tab: https://hub.docker.com/r/svanhoofsensolus/quuppa-bridge, into your local docker-compose.yml file.
- Now, set the value of the sensolus.secret environment variable (default value CHANGEME in the template) to the value of the Secret field of the Quuppa infrastructure item in the Sensolus platform - as described above.
- Verify that the Docker image tag refers to the latest available release of the SQB.
- In default situations, no other parameters need to be changed.
- Save and close the docker-compose.yml file.
Take note that the docker-compose file instructs the SQB docker container to open port 6111 for UDP traffic. This will be used by the QPE data UDP push, as described further on this page.
To start the SQB:
- Launch the docker compose UP command in background mode and start the LOGS
command to see the output.
cd /opt/sensolus-bridge sudo docker compose up -d && sudo docker compose logs -f - To quickly confirm correct operation, you should see log lines containing 'Successfully connected' and there should be no ERROR-level log lines.
- Unless you have already configured and activated the data out from the QPE, you should not see additional new log lines appearing because the SQB is only listening but not receiving data.
- Type ctrl-c to exit for the log output.
To stop the SQB:
- Launch the docker compose DOWN command in background mode and start the LOGS
command to see the output.
cd /opt/sensolus-bridge
sudo docker compose down
To view the console output while the SQB is running:
cd /opt/sensolus-bridge
docker compose logs --follow --tail 1000
For any change to take effect, the SQB needs be restarted using docker compose commands.
Configuring Quuppa Data outputs towards SQB
The next step, once the SQB is installed and listening for incoming data, is to configure the data outputs for QPE. This is done via the Quuppa Site Planner application.
Strictly speaking, you can already prepare this step before installing the SQB.
First, define a data format named "sensolus".
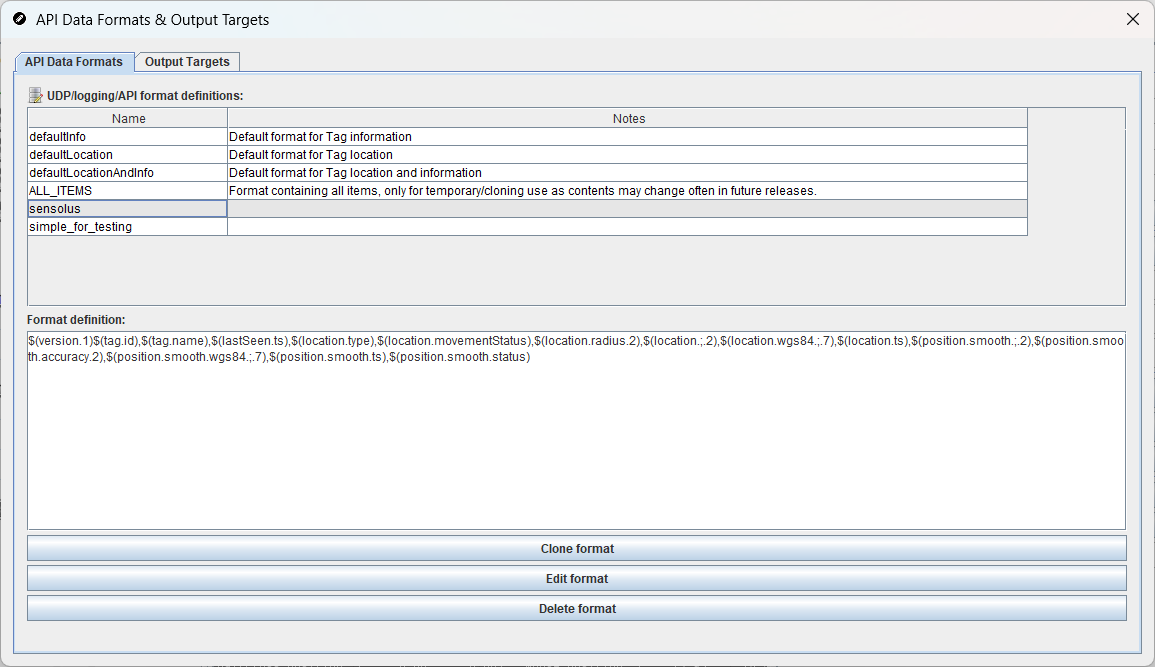
Use the following format definition:
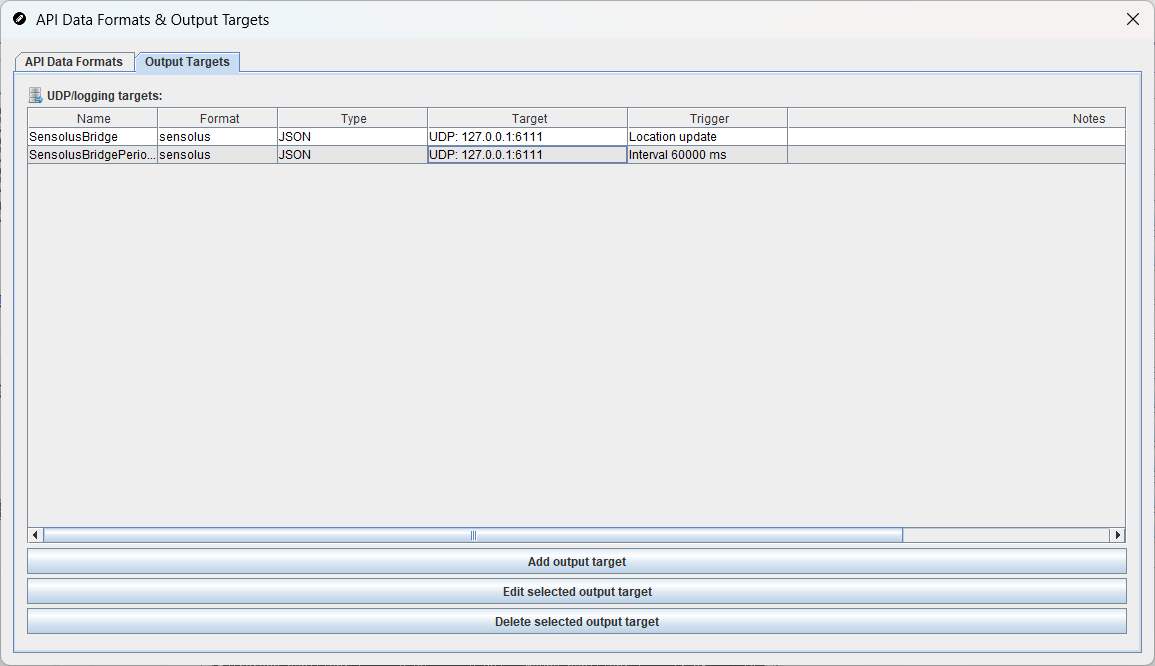
$(version.1)$(tag.id),$(tag.name),$(location.type),$(location.movementStatus),$(location.radius.2),$(location.;.2),$(location.wgs84.;.7),$(location.ts)Next, we define two output targets. They both need to push JSON messages via UDP to the SQB (by default running on the local host, listening at port 6111, as defined in the docker-compose file).
- One first output target definition has trigger mode 'Position update'. This data
stream will ensure that the SQB is notified of any position change.
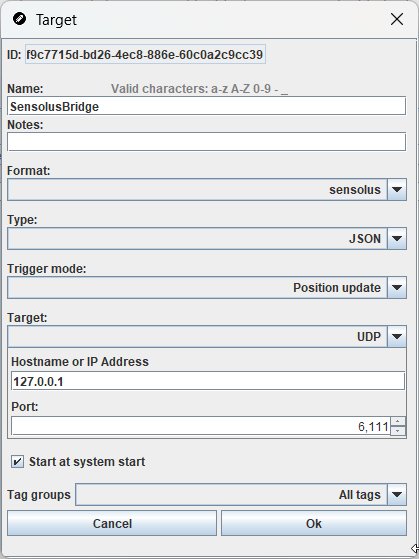
- The second out target definition has trigger mode 'Interval', defined at 60
seconds. The purpose of this data stream is to keep confirming that trackers
whose position did not change are effectively in the Quuppa zone. By default,
the SQB bridge will declare an EXIT event when a tracker has not been seen
during 180 seconds - so a 60 second interval is flexible enough without risking
false EXIT events due to occasional processing delays.
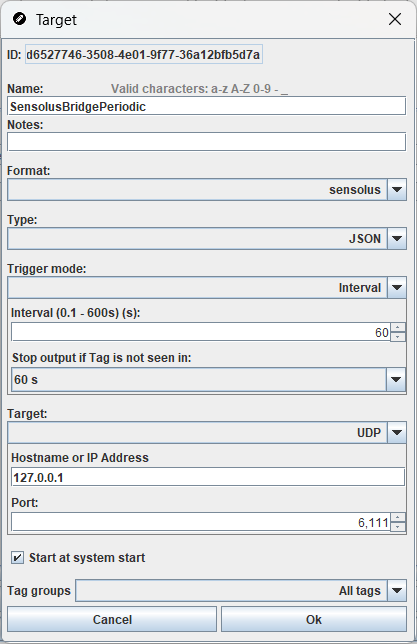
In summary, there should be two output targets:
Save the project, submit and deploy to your server.
Testing the integration
After having applied the above mentioned configurations, you can start testing.
- Initially, test with the QPE live map view. Sensolus trackers should become visible if they are configured to advertise in Quuppa format.
- After having confirmed visibility in the QPE map view, ensure that the SQB is
running. Then, in the Sensolus platform:
- Navigate to the Infrastructure Item representing the Quuppa installation. The status should be 'OK' and the last seen timestamp should be very recent.
- The locations of trackers currently in the Quuppa zone, will be updated. Verify the location history of the trackers.
- If you remove a tracker from the Quuppa zone (so that QPE does not see it anymore, or only sees is with locationType 'Presence'), then an EXIT location event will be inserted in the tracker location history after 3 minutes (180 seconds - unless configured otherwise).
SQB parameters
The SQB can be configured using the following parameters (as environment variables in docker-compose.yml):
| Parameter | Meaning | Example values |
|---|---|---|
| sensolus.host | Hostname of the Sensolus platform. Should not be modified in normal cases. | https://cloud.sensolus.com (default) |
| sensolus.secret | Paste the value of 'secret' field from the infrastructure item view. This uniquely identifies the specific Quuppa deployment. | abcd1234 |
| sensolus.keepAliveSeconds | Interval for periodic locations generation. Do not modify. | 3600 (default) |
| sensolus.minDistanceMetersSameState | Subsequent QPE location updates must exceed this distance from the last inserted location to insert a new location. Can be adjusted according to the business needs and deployment-specific Quuppa accuracy. | 5.0 (default) |
| sensolus.exitDelaySeconds | Exit events will be generated when the asset is not seen by QPE during this amount of seconds. Default 3 minutes. Change only for business-specific needs. | 180 (default) |
| sensolus.logpackets | For debugging purposes. If true, SQB will log all messages as it received from QPE. | false (default) or true |
| log4j2.status | Loglevel threshold. Default is INFO ; change only to DEBUG for issue investigation purposes. | INFO (default) or DEBUG |
| TZ | Linux timezone. Set to the correct timezone to avoid logging in UTC time. | Europe/Brussels |
Uploading tagNames (optional)
Sensolus trackers advertise themselves to quuppa using a Hexadecimal ASCII text notation of their 6-character serial. For example, a tracker with serial 'ABCDEF' is identified in Quuppa as tagID '414243444546'. The 'tagName' field is not announced to Quuppa (because BLE compatibility mode is used), which results in seeing the hexadecimal ID values in the QPE map view.
You can use an online HEX to ASCII website to find the serial, based on the hexadecimal tagId (example: https://www.rapidtables.com/convert/number/hex-to-ascii.html.
This is not practical if you often have to identify trackers. There is a way to upload a file with id-name mappings. For this, a file called autostart.quuppatagjson must be created in the /opt/quuppa/PE/tags directory (see the Quuppa API documentation for the exportTags and importTags methods, or also https://www.quuppa.com/documentation/QPE/topics/QPE_tag_batch_configuration.html).
To generate the list for all Sensolus Quuppa compatible trackers in your organization, some fancy Excel wizardry can help:
- In the Sensolus platform, export the tracker list. You need the column 'serial' . Optionally include the name or the thirdPartyId if you use this.
- Use the following excel formula to convert the serial to hexadecimal notation
(assuming the serial is in cell
B2):
=LOWER(TEXTJOIN(;TRUE;DEC2HEX(CODE(MID(B2;ROW(INDIRECT("1:"&LEN(B2)));1))))) - Use CONCAT function to construct one line of JSON, in another excel function, to
construct for
example:
{"id": "414243444546", "name": "BOX-0001 ABCDEF"}, - Apply to all trackers, copy-paste the JSON lines in the autostart.quuppatagson and call the importTags method on that file.